Do you want to know how to create good quality fresh pins for your Pinterest account and other social media posts?
Pinterest marketing can be overwhelming sometimes. However, most importantly, it can be chaotic, creating new pins every now and then. Obviously, you have to pin almost a few new pins every day to stay in the game, no?
If you are a new blogger or an online business marketer, let me break you that creating a pin isn’t a cup of ice cream. A lot of hard work goes into creating every pin distinctive and unique. Until or unless you have all the time in the world to make fresh pins every day, you can use ‘Tailwind Create’ to simplify pin creation and cut yourself some slack.
If you are new to Tailwind and Tailwind Create, then hang on with me as in this step-by-step guide, I will explain how to use Tailwind Create for Pinterest and how you can benefit from it.
I would also recommend you to go through my ultimate guide on how to use Tailwind for Pinterest to Crush Your Marketing Goals in 2021.
Update: Tailwind has just launched a free forever plan! This means that you can use this social media management platform for your business without paying anything. You might be wondering if there are any catches, and the answer is NO.
There’s really nothing to lose by signing up for their free forever plan so why not give it a try? If you like what they offer but want more features or support, then upgrade to one of their paid plans which start at only $9 per month.
Let’s start it!
Please note, I’m an affiliate for Tailwind and if you make a purchase through an affiliate link, I will receive a small commission at no additional cost to you. See my full disclosure policy here. Additionally, I was paid a bonus commission for sharing my experience with Tailwind Create in this post. I only recommend products that I personally use and believe they can help my audience too. Thank you for reading!
What is Tailwind Create? Why do you Need it?
Unless you are living under a rock, you would know that Tailwind is a much-hyped marketing tool for Pinterest and Instagram. And to be honest, it’s rightfully so.
Tailwind Create is an advanced feature of the Tailwind app that helps in making your life easy by creating beautiful pins quickly. I might sound confusing right now but don’t worry I will explain everything to you.
But let’s start with the basics:
What basically Tailwind Create is?
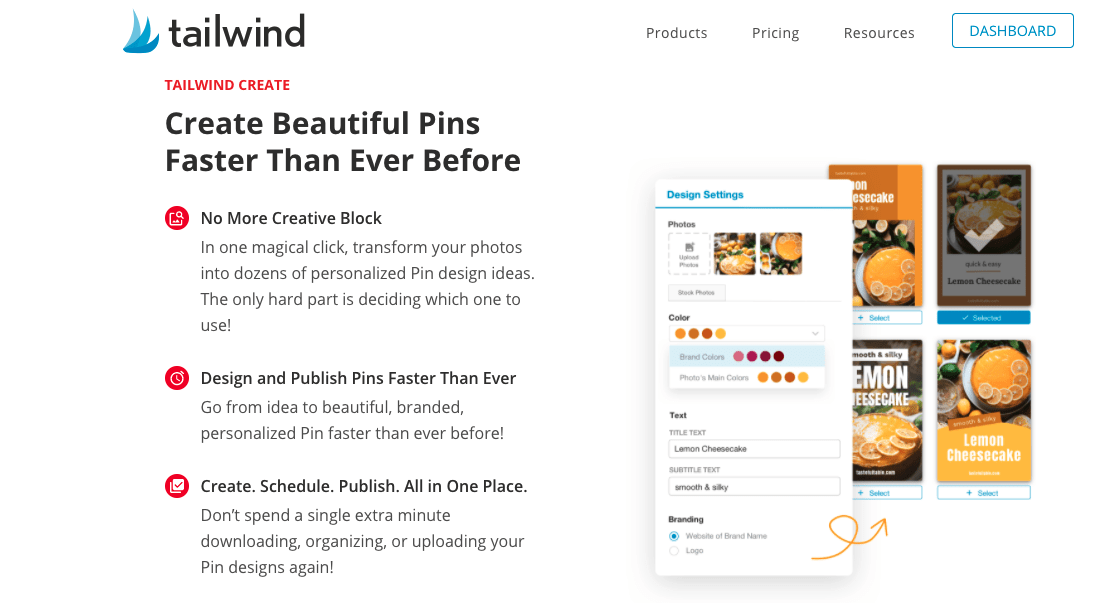
Tailwind Create is a new feature by Tailwind that helps you create beautiful and fresh pins faster for your Pinterest account.
But why do you need fresh pins on a daily basis?
Well, this is how Pinterest works. The Pinterest algorithm now encourages the users to bring and create fresh pins and prefers new ideas.
Times have gone by when you can repeatedly use old pins and expect the followers to get attracted to your content. Sorry to break you, this won’t work now.
Changed times, changed algorithms, and changed strategies; this is how it works now.
What are Fresh Pins?
Fresh Pins are defined by Pinterest as images or videos that are never seen before or saved to Pinterest for the first time. This can be any image that links to the same old blog post, page, or product listing, and would be considered fresh as long as it is new to Pinterest. source Tailwind/Pinterest
So here are some examples for “fresh pins“
- A new pin from a new post or an old post
- Any new pin based on an old pin with changes in images, fonts or colors
Get the hang of it already!
Here, Tailwind Create can be your best friend in making beautiful fresh pins for Pinterest.
To save yourself time, you can make beautiful fresh pins quicker, and guess what? You can schedule it too.
Tailwind Create allows you to make the pins faster and hence keep up with your daily pin posting target, which can go up to 50 pins a day (but no spamming, you know right)
This feature is perfect for those people who are not very artistry and don’t possess much interest in graphic designing either. Just because you are not good at something doesn’t mean you can’t ace it.
All thanks to Tailwind Create for Pinterest. You can now be as good as some genius, pro handling a Pinterest account.
How to Use Tailwind Create?
Now the question arises, can you get the hang of this feature? Let me tell you it’s not that difficult; you will get used to it sooner than you think. Here is how you can use Tailwind Create in just 5 easy and fool-proof steps.
#Step 1: Open Tailwind Create
Don’t have a Tailwind account? That’s the first step, then. Create an account on the Tailwind app for Pinterest by visiting the Tailwind website. Once you have done making the account or opening it (if you already have one), you will see a tailwind dashboard in front of your eyes on the screen.
You will see a Paintbrush icon on the left of your Tailwind screen or a ‘Create new images’ button on the top of your publisher dashboard. Select any of these, this icon is for Tailwind Create.
Dashboard➜ Publisher dashboard➜ Create➜ Start a new design.
#Step 2: Set Your Preferences
One of the very initial things you get to see on your Tailwind Create page is to set your brand preference. The page will show you somewhat like a form you need to fill so that your preferences are in-line with what you create.
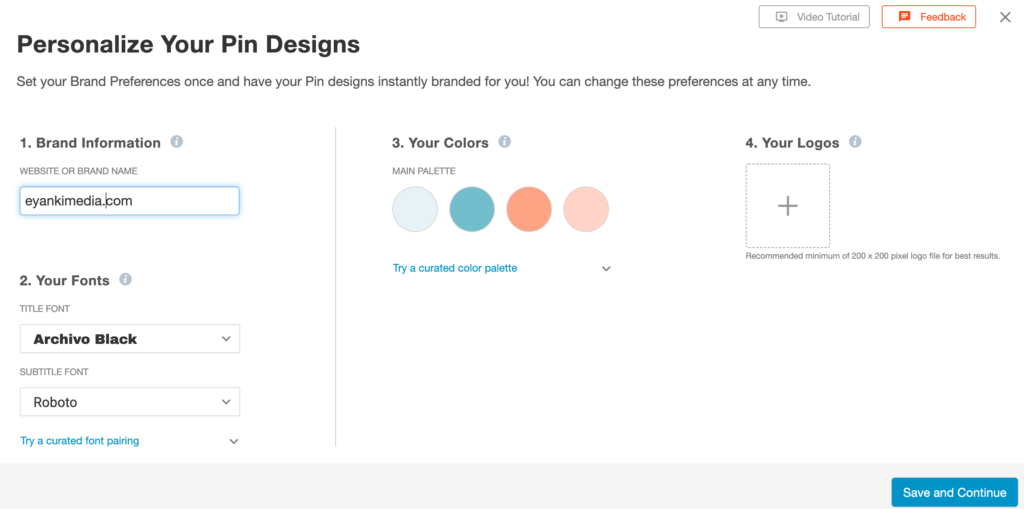
You will be asked to mention the following things:
- Website or brand name
- Fonts; title and subtitle font of your choice or choose for curated list from Tailwind
- Color palette; you are given an option of 4, or you can select from “Discover Curated Palettes”
- Brand logos
The entire information will be very basic and asked from you to help the app create automatic designs. Not to forget, every brand is distinctive, and the designs of the pins can be either engrossing or repelling for the pin users, so make sure that your pins stand out with the help of the information given. Save the preferences, and you are good to move onto the next step.
Also, don’t worry; you can always come back to make edits to your brand preferences or customize each pin you create in Tailwind Create.
#Step 3: Pin Setting
The third step is to set specific settings for your pins.
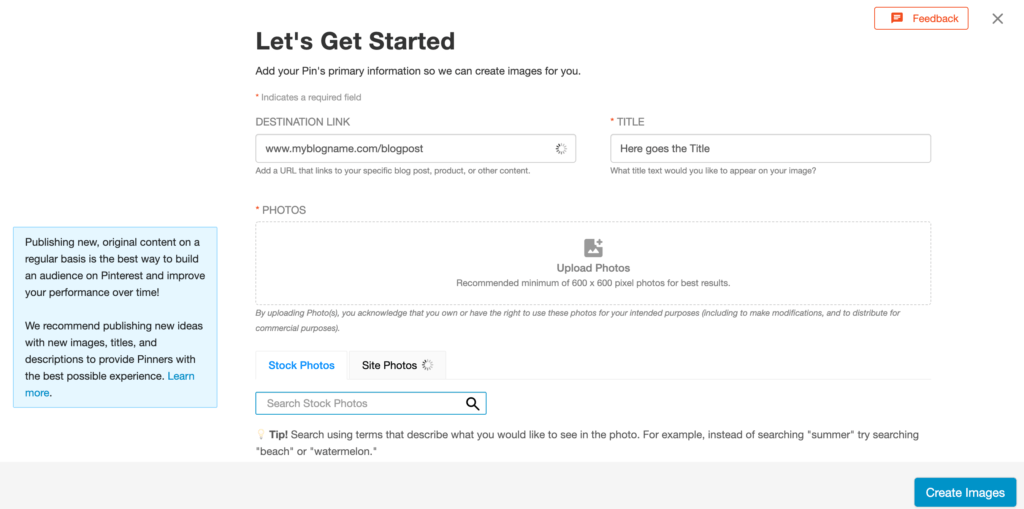
The settings include the following:
- The destination link for your pin
- Pin title; the title you want on your pin
- Photos; Images you want to be used as a design, you can use either of following
- Upload photos: To upload photos from your system
- Site photos; images that come directly from your website/blog (they will auto-populate)
- Stock photos; images that come from the stock of tailwind sources
Once you are done entering all the information, click Create Images, and that’s where all the magic happens.
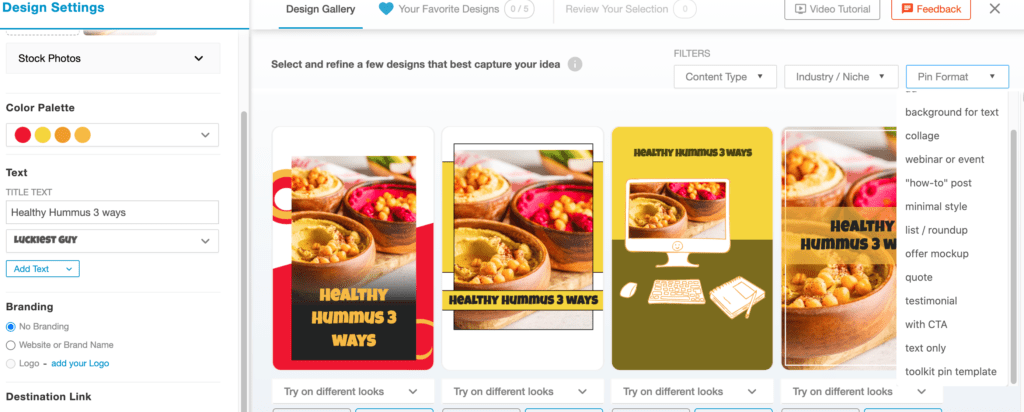
#Step 4: Choose Your Designs
This is where you will see the ‘magic of Tailwind Create’!
With a huge pool of designs, one might get confused. But guess what? You can cut down your options by going to the right top corner; you will find filters. The options like niche, pin format, or the type of content can help you decide which pin designs you want to go for.
Pin Format
What kind pin do you want? If you want a college, it will create a collage with images you uploaded. Isn’t that too convenient? If it’s an opt-in type Pin you can add a call to action too!
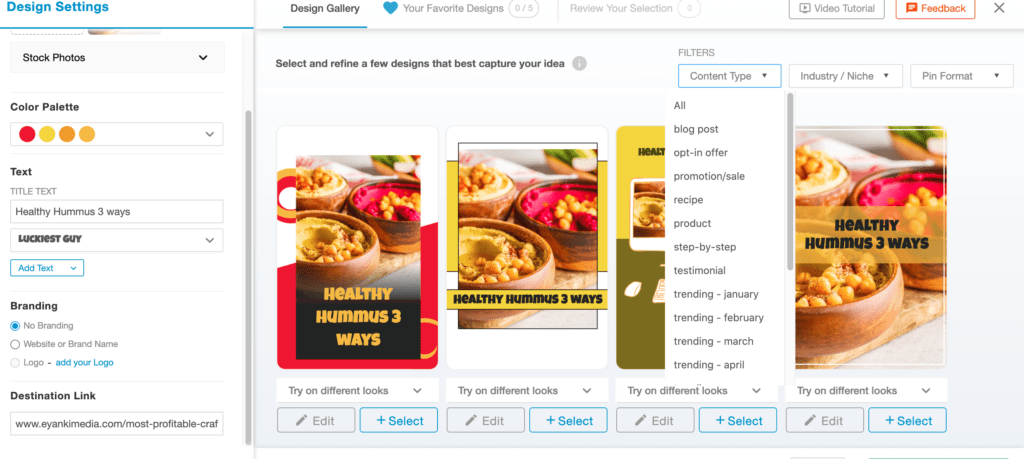
Content Type
Here you can choose the kind of content on the link is. Options range from a blog post, opt-in form to any trending content.
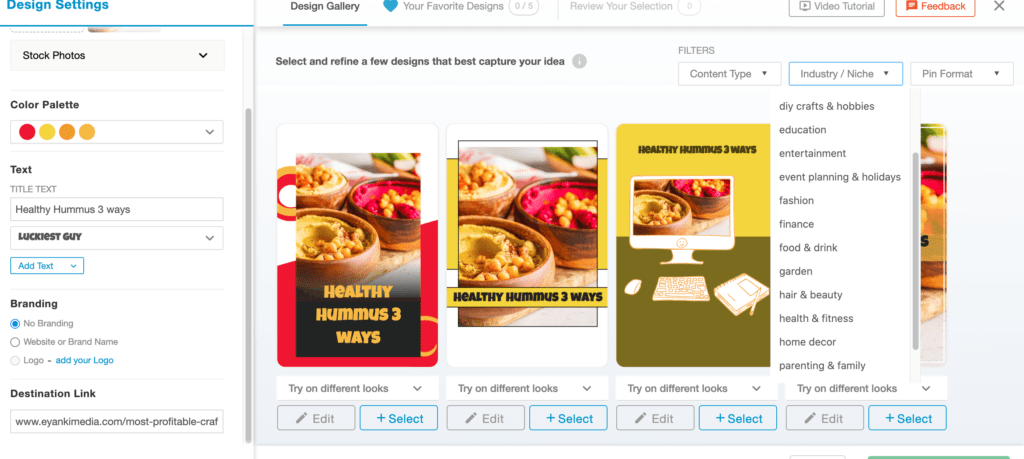
Niche
Here you will pick your Niche and it will show designs that suit best for your Niche. Example, on choosing food and drink, this laptop pin design (3rd pins) will filter out and it will only show designs that work best for food pins.
Want to know another helpful tip?
You can always star the most favorite pin designs so that you don’t have to find them every time you feel like using them.
#Step 5: Customize According to Your Preferences
You read the title right. If you really want to gain the attention of your followers, then this is recommended for you!
Tailwind create is like an editor and provides all the features that you expect any photo editor to perform. Increase or decrease the size on anything, add or subtract any props, crop, adjust the brightness, and choose color; is there anything that tailwind creates doesn’t offer?
Although, you always have an option to use the designs that the tailwind creates suggest you. But you also do have the option of editing the photos. There is a lot that you can play with. For instance, you can try on different looks by shuffling and changing the color palette, changing layout or pictures.

Edit your pins to add elements
You can further customize your pins by clicking the edit icon at the bottom of any pin. The selected pin will be opened in a separate editor dashboard and from there you can do changes in that particular pin. You can add subheadings, elements, change fonts and colors of the particular pin, and so on.
Once you have personalized your pin, you can save it or schedule it on Tailwind.
And that’s it!
There you are with your own pin created on the Tailwind for Pinterest.
Wasn’t it so simple? Or even if you find it a bit hard, no worries, you will be used to it. And once you start using it, there is no way back.
What are the Benefits of Tailwind Create?
You must have sorted how Tailwind Create can help you design beautiful and fresh pins and improve your Pinterest Marketing. But let’s just highlight them, shall we?
- It is super convenient to use.
- You can create high quality Pinterest pins or other social media posts from scratch faster than before.
- You don’t have to be a pro at designing for using Tailwind Create. Tailwind does that for you.
- You can further customize your pins as per your audience.
- All in one app allows the designs, pinning, and scheduling of the multiple pins altogether.
If you were looking for a marketing tool to uplift your Pinterest account, increase the traffic, and boost the following, this is what you need. Tailwind Create is a fool-proof tool to help you save time and unnecessary efforts that you would have employed otherwise.
Now that you have this fantastic tool, why waste your resources?
Is Tailwind Create Free?
Yes, Tailwind Create has a free plan to use for bloggers, especially those who are just starting out You don’t need your credit card details or anything like that – just sign up with their plan and start designing right away! You can design 20 pins per month and get access to 5 communities in which everyone shares pins so they’re surer yours will be seen.
Tailwind Create Pricing
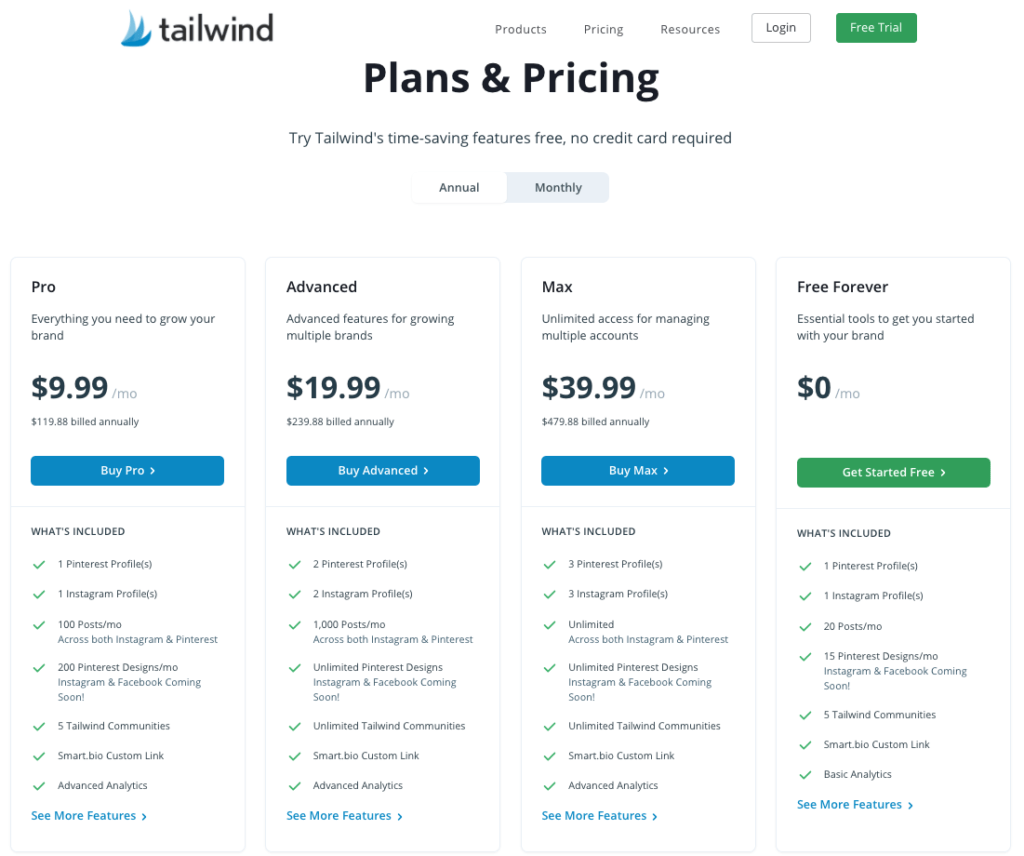
Tailwind has recently updated its pricing plans, Tailwind create has no more separate costs and is included in Tailwind pricing.
- Forever Free: 20 Tailwind Create posts per month with 20 posts to publish on Pinterest and Instagram, and access to 5 Tailwind Communities with a limit of 30 submissions/month.
- Pro Plan ($14.99 per month or $119.88 per year): 200 Tailwind Create posts per month with 100 posts to be scheduled on Pinterest and Instagram per month and access to 5 Tailwind Communities with 30 submissions per month.
- Advanced Plan ($29.99 per month or $239.88 per year): unlimited Tailwind Create posts on 2 Instagram and 2 Pinterest accounts and ability to 1,000 posts to publish per month, and unlimited access to Tailwind Communities.
- Max Plan ($59.99 per month or $479.88 per year): unlimited Tailwind Create posts on 3 Instagram and 3 Pinterest accounts, unlimited publishing, and access to Tailwind Communities.
But that doesn’t mean you have to pay without even being sure that it works for you or not. You always have the option of using Tailwind Create free and still gain from the many benefits that this feature offers.
In the free plan ny Tailwind, you get to create 20 pins a month and fav up to 5 designs. Isn’t it cool?
Used with other tailwind features, your Pinterest marketing, and handling game will be entirely changed. You can combine the create feature with tailwind communities, Smartloop, and smart schedule to benefit from it the most.
Is Tailwind Create Worth it?
There are no second thoughts about the effectiveness of Tailwind Create. It’s easy to use, efficient in making a beautiful pin faster, and helps with the scheduling of the pin. Moreover, it enables you to customize the pin designs if you want, so what else do you need?
You can always use the free plan by Tailwind to see if it’s your cup of tea and then update to the paid plans, which are again super affordable.
You can create Pinterest pins for a month together within a few minutes and still create attractive, unique multiple pins.
Everything about Tailwind Create is so good; definitely something everyone should try. With just a few clicks, you can create a couple of beautiful pins personalized according to your taste. If you are on the fence, try Tailwind Create Free Now!
Tailwind Create Review
Tailwind is a simple, fast, and affordable way to create beautiful pins that are optimized for any social media network.
We’ve found the best feature of Tailwind Create to be its ability to mass-create your own pin designs with just one click, saving you hours of time in design work. If you’re not already using Tailwind as a marketing tool on your website, now may be a perfect time! You can sign up for a free-forever account here!
How helpful did you find the blog post? Don’t forget to share your thoughts in the comments section below!
Tailwind create review: Make Pinterest Pins Faster and better
Tailwind is a social media management tool that helps you create new Pinterest pins in bulk. The latest release, Tailwind Create, makes it possible to generate beautiful images with one click and put them directly onto your Pinterest boards. This means that if you want to share the content on different boards or for multiple accounts, this will be much easier than before.
Price: Free
Price Currency: $
Operating System: app
Application Category: Scheduling tool
4.5

Great informative how-to guide that’s easy to follow! Well done!